
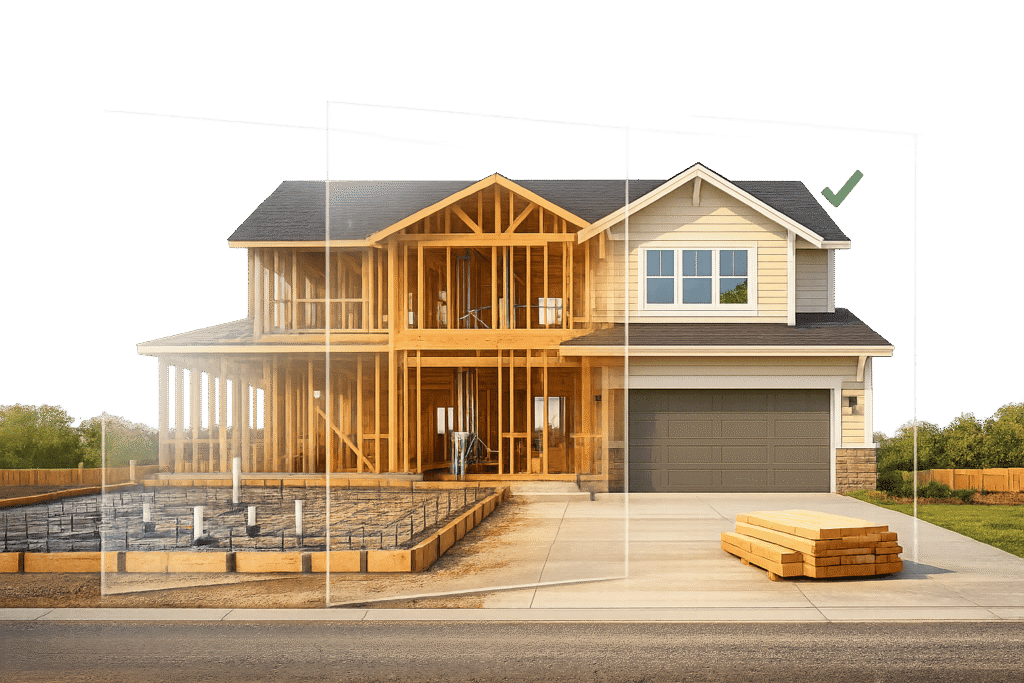
Buying a new construction home might seem like a guarantee of quality, but even brand-new properties can hide costly issues. Nearly 25% of new homes fail their first inspection, and 1 in 3 have code violations or defects. Common problems include foundation cracks, plumbing leaks, and HVAC malfunctions, often caused by rushed construction and labor shortages. Skipping inspections could lead to repairs costing thousands – or even tens of thousands – down the line.
Here’s how to protect your investment:
- Conduct 3 Key Inspections: Pre-pour (foundation), pre-drywall, and final walkthrough.
- Hire a Professional Inspector: Municipal inspectors only check for basic code compliance, often missing critical details.
- Create a Punch List: Document all issues before closing and ensure repairs are completed.
- Don’t Skip Warranty Inspections: Address settling or other issues before the builder’s one-year warranty expires.
In areas like Dallas-Fort Worth, where rapid construction and challenging soil conditions are common, inspections are especially important. Spending $300–$500 on an inspection can save you from repair bills ranging from $2,000 to $100,000.
Why New Construction Homes Need Inspections
Myths About New Construction Homes
Many people mistakenly believe that new homes are free of flaws – a costly assumption. In reality, 65% of buyers who inspected their newly built homes found issues, and 24% of these homes failed their first inspection.
While municipal inspectors ensure homes meet basic safety codes, they often overlook finer details of craftsmanship that can lead to problems down the road. Certified Master Home Inspector Austin Jenkins explains:
"Whenever you increase quantity, you decrease quality… They’re trying to get in and out of a job as fast as they can to get their paycheck."
The rising cost of construction compounds this issue. In 2024, construction expenses made up 64.4% of the average price of a new home, compared to 60.8% in 2022. Labor shortages and increasing material costs have pushed builders to rely on less-experienced workers and cheaper materials. This has led to 89% of homeowners reporting unexpected repairs or maintenance issues shortly after moving in. Common problems include failures in major systems like security (37%), plumbing (36%), and electrical systems (36%).
These realities highlight the importance of thorough, multi-stage inspections to protect buyers from costly surprises.
Risks of Skipping Inspections
Skipping an inspection on a new home can lead to serious financial and structural headaches. Real estate agent Jase Norsworthy shared a case where a buyer skipped an inspection on a new condo, only to discover six months later that the bathroom fan vented directly into the attic. This caused mold growth and sagging sheetrock, requiring expensive repairs.
Another incident in 2025 revealed an even more alarming defect. An inspector discovered that an exterior brick wall of a new home wasn’t properly secured to the main structure. The wall moved when pushed, allowing the buyer to cancel the contract immediately. Other inspections have uncovered concrete poured into drains in brand-new homes, a defect that could cause severe plumbing issues shortly after move-in.
The financial burden of undetected problems doesn’t stop at immediate repairs. Insulation gaps can drive up energy bills, mold can pose health risks, and unresolved issues can lower the home’s resale value. Builder warranties, which typically last one year, are reactive rather than preventive. They often exclude cosmetic issues or normal wear and tear. Once the warranty expires, homeowners are left to handle all repair costs – and major structural fixes can easily cost tens of thousands of dollars. These risks emphasize why inspections are a crucial step in the home-buying process, setting the stage for the next discussion on the three critical inspection phases.
New Construction Home Inspection Uncovers Major Issues
3 Inspection Phases for New Construction Homes
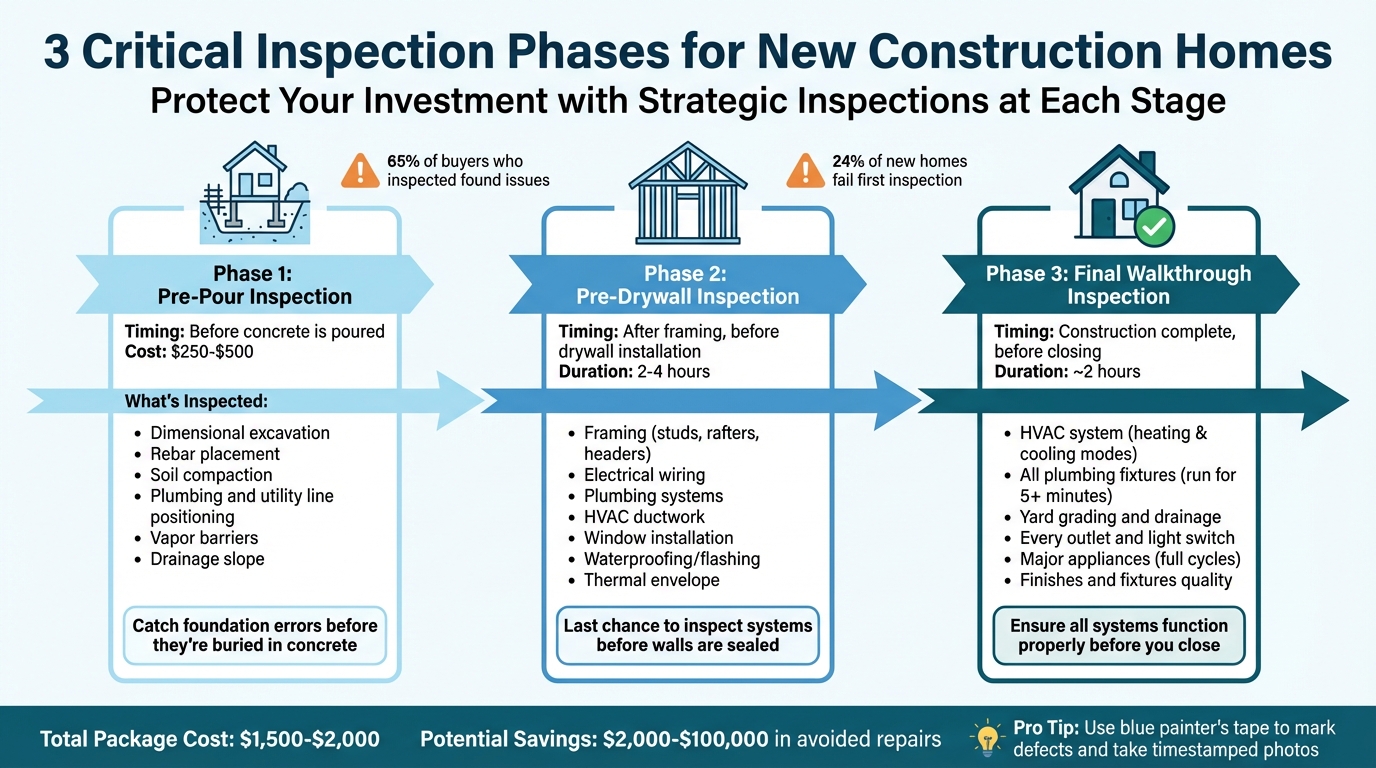
3 Critical Inspection Phases for New Construction Homes
When building a new home, protecting your investment means conducting inspections at three key stages of construction. Each phase uncovers specific details of the building process, and skipping any one of them could leave costly problems hidden beneath the surface. Inspection packages typically cost between $1,500 and $2,000, with individual inspections ranging from $250 to $500. These inspections work together to ensure every critical component of your home is thoroughly checked.
Pre-Pour Inspection
The first inspection happens after the site is prepared but before the concrete is poured. Ed Roberson, Owner of HomeTeam, explains the focus of this step:
"We’re looking at the dimensional excavation at the site, the arrangement of the steel and all of that … prior to the concrete being poured".
Inspectors check the placement of rebar, ensure the soil is compacted correctly, and confirm that plumbing and utility lines are properly positioned. They also verify that the forms are free of debris, organic materials, and standing water. Vapor barriers must be installed correctly, and the ground should slope away from the foundation to allow for proper drainage. Catching issues at this stage is crucial because fixing foundation or underground plumbing errors after the concrete is poured can be both expensive and invasive. As HomeLight points out:
"Foundation repairs are costly, so it’s important to ensure that structural supports and piping are properly installed and capable of functioning before they’re covered in concrete".
Pre-Drywall Inspection
The second inspection occurs once the framing is complete but before insulation and drywall are installed. This is the last opportunity to inspect the home’s internal structure and systems before they are sealed behind walls. A typical pre-drywall inspection takes 2 to 4 hours, depending on the size of the home. Inspectors review framing elements like studs, rafters, and headers, ensuring they meet design plans and safety codes. They also check the installation of electrical wiring, plumbing, and HVAC ductwork. Additional checks include window installation, waterproofing elements like flashing, and the home’s overall thermal envelope.
Real estate agent Cassie Scramlin emphasizes the importance of this step:
"When they’re building so quickly and they have crews coming and going all the time, it’s easy for something to be incorrect".
This is also a good time to document the open walls with photos and videos, creating a reference for the location of wires and pipes in case of future renovations or repairs. Ensure the thermostat is placed away from direct sunlight, vents, or heat sources to maintain accurate temperature readings. Once all systems are inspected, a final walkthrough ensures everything is functioning properly.
Final Walkthrough Inspection
The last inspection happens when construction is finished but before you close on the home. This walkthrough typically takes about two hours and involves testing all systems and inspecting every detail. Test the HVAC system in both heating and cooling modes, flush toilets, and run faucets for at least five minutes to check for leaks.
Make sure the yard is graded to direct water away from the foundation. Test each outlet and light switch with a small electrical device, like a phone charger, and run full cycles on major appliances such as the dishwasher. Look over finishes and fixtures to ensure they meet quality standards.
Michael Perna, Realtor with The Perna Team, highlights why this step is so important:
"Once the deal is closed, the builder’s motivation to quickly resolve these issues can significantly decrease".
Use blue painter’s tape to mark any defects, from chipped paint to cracked tiles, and take photos of each marked area to ensure repairs are properly addressed.
Common Defects in New Construction Homes
After completing detailed inspection phases, it’s important to focus on the most common defects found in new construction homes. Spotting these issues early allows for timely repairs while the builder is still accountable. Knowing what to look for ensures potential problems are addressed before closing.
Foundation and structural problems are frequently tied to poor soil preparation or natural settling. During the first year, wood shrinkage can cause the house to settle, leading to cracks in walls or ceilings, uneven flooring, and doors that stick or don’t close properly. Another telltale sign is "nail pops" – small bumps on walls where shrinking lumber pushes drywall fasteners outward. A simple way to test for uneven floors is by rolling a ball. Once these are checked, it’s time to move on to plumbing systems.
Plumbing defects are another common issue. Look for leaks, slow-draining sinks, low water pressure, and inconsistent hot water delivery. These problems can often be overlooked but are crucial to address. From here, shift attention to electrical systems and climate control.
Electrical and HVAC problems can pose safety risks and reduce overall comfort. Use a circuit tester on every outlet to check for ungrounded wiring or reversed polarity. Watch out for flickering lights or frequently tripped breakers – these could indicate that the home’s wiring isn’t sufficient for its energy needs. Ensure all air registers provide adequate airflow and confirm the HVAC system is properly sized for the home’s square footage. Poor ventilation in areas like the attic or bathrooms can lead to moisture buildup and mold. After this, inspect the home’s exterior and drainage systems.
Exterior and drainage issues can lead to long-term damage if not addressed promptly. Make sure the ground slopes at least 4 inches away from the foundation to prevent water pooling. Inspect the roof for missing shingles and faulty flashing, and check drainage performance after heavy rain. Examine the siding for gaps or signs of improper installation. Fred Rodrigues, Owner and Inspector at Damngood Inspection, highlights the challenges builders face:
"Builders are under a lot of pressure to deliver as many houses as they can, as fast as they can, to fulfill their financial obligations with their shareholders".
This fast-paced environment often results in oversights that only a thorough inspection will uncover.
sbb-itb-9bb2e84
What to Do After Inspections
Once inspections are done, the next step is to document any issues and secure the builder’s commitment to making necessary repairs. This phase is crucial because without a clear process, important problems might be dismissed as minor, only to turn into bigger headaches later. Here’s how to tackle this effectively.
How to Create a Punch List
A punch list is essentially a checklist of everything that needs to be fixed or completed before you accept the home. This includes cosmetic issues (like chipped paint), functional problems (such as faulty light switches), and unfinished work. Typically, this list is created one to two weeks before closing, often with the builder’s customer service team.
Start by conducting a walkthrough of the home. Use blue painter’s tape to mark defects directly on the surfaces – things like paint chips, uneven trim, or gaps. Take timestamped photos or videos for evidence. Refer back to your inspection report to ensure nothing is missed. Organize the list by room, and clearly label each item as safety-related, functional, or cosmetic. Make sure to keep a consistent distance from walls and surfaces to spot flaws accurately.
Plan your walkthrough during midday for the best natural light, which helps you see imperfections more clearly. Bring your original contract, selection sheets, and blueprints to confirm that all upgrades and finishes match your agreement. Test everything – appliances, plumbing fixtures, outlets, and switches. Also, check online to confirm inspections are complete and that a Certificate of Occupancy has been issued.
Once your punch list is ready, have the builder acknowledge it in writing. This step is essential for accountability. Include the punch list in your closing documents, as failing to do so could result in losing your right to enforce repairs later. As the Miller Law Firm explains:
"If the buyer does not walk through the completed home and perform a detailed inspection before the closing takes place, the buyer will have waived a right to have the builder complete overlooked items in a workmanlike manner."
Ask for specifics about repair timelines – when they’ll be completed and who will keep the master copy of the list. If major repairs are still pending, don’t hesitate to delay the closing. Once the punch list is finalized, schedule a re-inspection to verify all repairs meet the agreed-upon standards.
Re-Inspection Before Closing
The re-inspection is your chance to confirm that all punch list items have been addressed properly. Don’t just take the builder’s word for it – arrange for a follow-up inspection. Real estate agent Cassie Scramlin emphasizes this point:
"Rather than just being satisfied that the builder says, ‘Yeah, these [repairs] are done,’ see if the home inspector can go back and check the checklist to make sure all of those items were completed."
During the re-inspection, go through each item on your punch list systematically. Compare your original photos and notes with the current condition. Test all systems again – make sure the HVAC works in both heating and cooling modes, check for leaks under sinks, and ensure doors and windows open and close smoothly. Pay extra attention to common issues like nail pops and drywall cracks, which often appear as the home settles.
At this stage, also confirm that you’ve received all keys, appliance manuals, and manufacturer warranties. These are crucial for future maintenance and warranty claims. If you find incomplete or poorly performed repairs, document them with new photos and request another follow-up before closing. For larger issues, you might negotiate an escrow holdback, where part of the funds is withheld until the repairs are fully completed.
Inspecting New Construction Homes in Dallas-Fort Worth
Dallas-Fort Worth presents some unique challenges when it comes to new home construction. One of the biggest culprits is the area’s Blackland Prairie Clay, which expands when wet and shrinks when dry. This constant movement can shift foundations and cause cracks, even in brand-new homes. Ignoring these issues can lead to costly repairs – foundation fixes alone can exceed $10,000.
The area’s rapid growth adds another layer of complexity. In 2023, DFW ranked 6th nationwide for homebuilding prospects. Cities like Frisco, Plano, and McKinney are buzzing with construction activity, but the speed of development often results in rushed timelines and overlooked details. Common issues include improperly installed electrical wiring, missing insulation, and HVAC systems that may fail within the first year – repairs that can easily top $5,000. Inspectors in the region frequently report unique problems like unfinished shower thresholds leading to water damage, sagging roof decking after heavy rains, and misaligned sprinkler systems that create water exposure risks. High humidity in the area further complicates matters, making proper plumbing installation critical to avoid mold and harmful bacteria.
A professional home inspection in Dallas-Fort Worth typically costs between $400 and $700, depending on the size and scope of the home. Working with a Texas Real Estate Commission (TREC)-licensed inspector is crucial, as they understand the local soil conditions and building codes. For buyers navigating these regional challenges, expert inspections are more than a precaution – they’re a necessity.
How Tom’s Texas Realty Can Help

Navigating the complexities of buying a new home in DFW can feel overwhelming, but Tom’s Texas Realty offers tailored solutions to make the process smoother. Their Triple The Inventory Service helps buyers find homes at competitive prices in even the toughest seller’s markets. They also provide access to off-market properties that aren’t listed on the MLS, giving buyers exclusive opportunities. For those exploring specific neighborhoods, Tom’s Texas Realty offers detailed spotlights on areas like Palmilla Springs, Tavolo Park, and Midlothian. They also evaluate prominent builders in the region, including Highland Homes, David Weekley, HistoryMaker, and Sandlin, and guide buyers on practical considerations like choosing between 50-foot and 60-foot lots or finding affordable new construction options – some priced under $300,000 in Fort Worth.
For buyers interested in homes needing a little TLC, the Fix-Me-Upper Program offers precise cost estimates and manages renovation details. If traditional mortgages aren’t immediately an option, rent-to-own programs and quick mortgage qualification services (no credit pull required) are available. Beyond just property searches, Tom’s Texas Realty provides free downloadable guides, a YouTube channel with market insights, and a monthly newsletter packed with updates. Their personalized consultations cover everything from understanding the region’s tricky soil conditions to coordinating phase inspections and navigating builder warranties.
This hands-on approach ensures buyers are well-equipped to make informed decisions in a market as dynamic as DFW.
Understanding the Dallas-Fort Worth Market
When it comes to DFW homes, local knowledge is invaluable. The region’s red clay soil, known for being highly expansive, often causes minor cosmetic cracks. However, as G.L. Hunt Foundation Repair explains:
"In the Fort Worth area, the dominant soil is expansive clay. This classification can cause more structural problems compared to other types, like sandy or rocky soils."
Proper site grading is critical to counter these soil challenges. A minimum slope of 5% over 10 feet ensures effective drainage, reducing the risk of foundation issues. During inspections, it’s essential to confirm that the yard is correctly sloped and that drainage systems are working as intended. With Texas’ extreme weather – alternating between heavy rains and droughts – maintaining consistent moisture levels around the foundation is key to minimizing soil movement.
For buyers attending a blue tape walkthrough, following the "4-to-6 foot rule" can simplify the process. This means marking only cosmetic flaws visible from a standing distance of 4 to 6 feet, helping to focus on meaningful issues without creating unnecessary disputes. Scheduling your professional inspection on a Tuesday or Wednesday – before a builder’s Thursday orientation – gives you enough time to review the findings and address concerns.
Lastly, don’t skip the 11-month warranty inspection. This final check is your chance to catch issues like nail pops, drywall cracks, or foundation shifts that may have developed during the first year. Addressing these problems while still under the builder’s warranty ensures they’re fixed without additional costs.
Conclusion
New construction homes might look perfect on the surface, but as we’ve outlined in the phased inspection process – from pre-pour to final walkthrough – they often hide issues that can lead to unexpected costs. In fact, nearly 9 out of 10 new homes require maintenance sooner than anticipated, with common problems involving electrical systems, HVAC units, or plumbing – issues that could often be identified early on with proper inspections.
Having expert guidance during these inspections is critical. A TREC-licensed inspector familiar with local conditions, like the expansive clay soil found in Dallas-Fort Worth, can help you sidestep expensive repairs, especially when it comes to your home’s foundation. Real estate agent Jase Norsworthy emphasizes this point:
"As an agent, I have always encouraged my buyers, whether it’s new construction or a hundred-year-old house, to do an inspection."
Don’t forget to schedule an 11-month warranty inspection before your builder’s warranty expires. This allows you to address any settling issues while you’re still covered. Keeping detailed records of inspections and repairs is another smart move. Spending $300–$500 on a final inspection may seem like an added expense, but it can save you from much larger repair bills down the road.
Partnering with knowledgeable professionals, like the team at Tom’s Texas Realty, ensures you have the local expertise needed to protect your home. In the fast-paced Dallas-Fort Worth market, thorough inspections and informed decisions aren’t just helpful – they’re critical to safeguarding your investment. A careful, phased approach to inspections paired with expert support can make all the difference in protecting both your home and your peace of mind.
FAQs
Why should I schedule multiple inspections for a new construction home?
Scheduling multiple inspections for a new construction home is crucial to maintaining quality and identifying potential issues at different stages of the build. Problems like uneven framing, plumbing mistakes, or electrical missteps can sometimes slip through during construction. Catching these early not only saves money but also helps you avoid major headaches down the road.
Key milestones to schedule inspections include the pre-drywall phase, the final walkthrough, and the period before your warranty expires. These checkpoints ensure everything is up to safety standards and built to last. Plus, they give you peace of mind knowing your investment is well-protected for the long haul.
What common issues can a home inspection uncover in new construction properties?
Even newly built homes can hide problems that only a professional inspection might reveal. For instance, foundation defects like cracks or uneven areas can lead to serious structural issues or water damage over time. Similarly, roofing problems are common, often stemming from rushed construction or subpar materials.
There are also less obvious concerns, such as plumbing, electrical, or HVAC system flaws, which might not show up right away but could result in costly repairs or inconveniences down the road. Inspections can highlight issues like poor drainage, water leaks, or improperly installed fixtures. Addressing these problems early ensures your home meets safety standards and saves you from future headaches.
How can buyers make sure all repairs are completed before closing on a new construction home?
To make sure all repairs are handled before closing on your new construction home, start with a detailed final walkthrough, often called a pre-closing inspection. Bring along a checklist to carefully inspect everything – from finishes to functionality – and compare what you see to your contract and the agreed-upon specifications. If you spot any problems or unfinished work, document them in a punch list and share it with your builder.
Once the builder has addressed the items on your punch list, schedule another walkthrough to confirm the repairs meet your expectations. It’s also a good idea to hire a professional home inspector during this process. They can catch issues you might overlook, giving you extra confidence that everything is in order. These steps help ensure your new home is ready for you to move in before you finalize the purchase.